
How to Locate the Secret Course of Valorant
Riot Games has released a beta in Valorant for the multiplayer to make their FPS tactics better for competition. Just like many multiplayer games Apex Legends and Rainbow Six Siege, Valorant is also looking for the same competition in the game, and that is why they have released a secret course for that. To attack the players and keep them stick to the game, they have released some unique features in Valorant beta. Among those features a secret course arena for practice available that players should locate.

Locate the Secret Course
To locate the Parkour challenge in Valorant secret, you need to get into the practice arena on the top corner right-hand side of the main screen. To choose different areas of practice, you need to select the “open range.” Every selection of the area is connected to each other, so the Parkour course will automatically get into the access through choose any given option.
After you get into the level, turn 45 degrees to the left and round corner to get out of the building. Instantly take the turn right from the shattered archway. Keep going ahead through the benches and stop when you reach the small size of the staircase that leading through the narrow walkway. There blue and yellow color of graffiti available that will indicate the beginning of the Parkour course.
Finish the Parkour Challenge
Once you are heading to the stairs, then you will see the “Course Started” sentence of the word on the screen. The course section can begin through the same navigation sentence through the same sentence of words, but the staircase is the beginning point of all these.
Later from there, the indication requires landing jumps in the small area. If you don’t know the path to where to go on the given platform, you can always follow the jump route for that. Once you reach the right place, you will see a checkpoint. So even if you die in the path, you will respawn on the checkpoint area instead of the beginning, of course. The checkpoint procedure is great, and it can be way too helpful when you are in a challenge. Checkpoint indicates that you have reached a certain level of the platform, which is the necessary location for every player to reach. However, it also saves your terms when you die in the middle by respawning you on the checkpoint area.
You can complete the course by any agent. Most probably, Jett is the most capable and easiest agent to finish the course through her jumping abilities and its slow sky falling. You still need to navigate the precise location for landing. However, its ability Updraft can cure mistakes. After you know the route, it will be easy for you to try the same challenge into harder difficulty.
Chloe Decker is a self-professed security expert; she has been making the people aware of the security threats. Her passion is to write about Cyber security, cryptography, malware, social engineering, internet and new media. She writes for Microsoft products at office.com/setup.
Source: https://haroffice.com/how-to-locate-the-secret-course-of-valorant/

Nvidia’s Geforce Now Loses Access to Titles from Warner Bros and Xbox Game Studio
The trending cloud gaming service, Nvidia GeForce Now is ceased to lose titles from Warner Bros, Xbox Game Studios, Klei Entertainment, and Codemasters. The subsequent news has been proclaimed by Nvidia, and they added that the titles will be removed after 24th April 2020.

Although the news will definitely spread despair among gamers across the globe it will sadden especially those who are fans of popular games such as Gear of War or Halo: The Master Chief Collection. As soon these games will not allow GeForce to access them, as ordered by Xbox Game Studios. Whereas Warner Bros will be restricted GeForce from its popular game included Batman: Arkham alongside Mortal Kombat. In the following race of boycotting Nvidia GeForce Now, Codemasters and Klei Entertainment are also taking part. The popular racing game developer, Codemasters will restrict GeForce from access to its popular games including Dirt Series. Whereas Klei Entertainment will stop it from visiting its popular games such as Mark of the Ninja and Don’t Starve.
Although, Nvidia GeForce Now is a popular game streaming platform it differentiates with others as it is too controversial. Several companies have already filed various lawsuits against it and their accusation stated that Nvidia GeForce Now didn’t inform publishers while selling games licenses for accessing into the cloud. In reference to this concern, Nvidia has taken its support from GeForce after subsequent allegations.
The following accusations were seemed to be disobedience until Nvidia GeForce Now launched their beta version for free. However, the real conflict occurs when Nvidia starts charging 4.99$ per month for it. Thus, it triggers the mind of its co-up publishers and they start restricting Nvidia GeForce Now from their games.
While being interviewed, the vice president of GeForce Now, Phil Eisler stated that the removal of the games from their streaming platform is a deliberate decision of the company. He added that they are about to include the service with digital game stores which will result in help to the publishers. He said that Publishers can now tag their game whenever they publish a new one and it is more authentic alongside the easy way to add games to the service library.
Although, it is not yet clear who removed those games and why but Nvidia GeForce Now vice-president also added that they are still allowing the gamers to stream popular games such as Far Cry and Assassin Creed. Whether it is a sort of enticing tactic or a real statement, we are still unaware of it. Talking about Microsoft and Warner Bros, they haven’t proclaimed or stated anything about the following context.

HOW TO SHARE YOUR ANDROID AND IPHONE SCREEN USING SKYPE
Sharing screen with someone else was real trouble for many people because it was used to only happen with screen recording applications. Now Skype can also use the remote control or screen sharing in the Android and iOS devices. It’s a great feature because while video calling or in any meeting conversation, this type of feature is way too helpful to represent the documents. If you are working from home and having group discussions or meetings, so this screen sharing feature will make a lot of things easy for others to understand.

How to Share your Android Screen from Skype
Launch the application, but remember that you need to use the latest version of Skype because, in the latest version, you will have this feature. Before using this screen sharing feature, you need to give permission to the app for video and audio recording compatibilities.
- Go on the conversation, and for sharing the screen, you need to tap on the video call button.
- After your call accepted, tap on the three dots located on the below right side corner.
- Look on the “Screen Sharing” option and click on that.
- In your Android, it will ask for your permission in the Skype application. Press on the “Start Now” button.
- If you don’t want to ask the same question, then you can press on the box of “Don’t show again.”
- Your device’s screen sharing will start. After that, you can minimize the application or switch the application to show the active display of your device.
- To stop the process after using the screen sharing, you need to go back to the Skype app, and there you will see “Stop screen sharing” to stop the sharing screen.
How to Share Screen in Your iPhone Device Using Skype
In the iPhone, the procedure will be quite different from the android devices. This feature is available in iOS after version 11. iPhone and iPad both devices are compatible, and in the conversation section of Skype, you need to tap on the “Video Calling” option.
- Tap on the “three dots” on the “Below Right Corner” side.
- Select the “Screen Sharing” option.
- After doing it, you will see the overlay of the tap of screen recording that will ask for the broadcast for which application. You need to choose Skype to use the screen-sharing and tap on the “Start Broadcasting.”
- In the above side of the display, you will see a red color of the bar, which represents that your device’s display is getting broadcasted. You can open any application during this.
- After completing it, you need to again open the Skype application and press on the “Stop Sharing” display to stop sharing.
By following these tips, you will be able to begin and close the process of screen sharing. Well, it does not take much time to understand the whole procedure, although it’s all available in the Skype app. If you are using the latest version of the app, then it will be available on your device.
Source: https://sewebroot.com/how-to-share-your-android-and-iphone-screen-using-skype/

HOW TO REMOVE JILL’S PARASITES IN RESIDENT EVIL 3 REMAKE
In the name of brutal and deadly characters, Resident Evil is always ready to surprise their fans. In Resident Evil 3 Remake version, the Nemesis hunting is a scary thing, but there are way more surprising things that players should know while discovering and playing further. This survival horror game has maintained its status in gaming by showing monsters and parasites. Every previous version has something improved and interesting, whether it is about characters or plots. This Resident Evil 3 Remake introduced Nemesis, who is behind the player relentlessly as they are looking for escaping the city.

Against Nemesis, players have several chances to avoid it because Nemesis will encounter with players in the game several times. There are several monsters in Resident Evil 3 Remake that players will square off. One of the particular creatures in the game is “Drain Deimos” that players will encounter on the sub train station.
When will Encounter Happen with Parasites in Resident Evil 3 Remake
After the use of lockpick on the sub train station, players will encounter “Drain Deimos” for the first time. After that, a small insect will leap on Jill to inject with parasites without any warning. Form this incident, Jill’s health will start the change in which walking slowly, and the red color screen will start to happen. In the inventory screen, if the player checks, they will see the health marked with parasites. The health will start to turn purple, which is an indication of the parasite. Jill system is completely overrun through parasites, and from that thing, players have to get rid of.
Everything that happened without any idea or warning and now situation are clear. In the sub-station room, players will find gardening tools where players will get to know to adjust it through the green herb. While playing keep in mind to pick up everything from the missions. If there is a green herb available, then use it in the inventory screen, and Jill’s body will throw the parasite from her body rapidly. After that, get rid of that parasite through a shotgun on the floor. It will improve the health of Jill, and it will start to recover at a rapid rate.
While moving around after the incident, Jill will start to move around normally. In the area, players are required to reset circuit breakers because the complete area is stopped because of “Drain Deimos.” It is great that in this area, players can find green herb easily and wet able to utilize that too. Players can keep the green herb in an alternative way too if they feel they might need it in further levels as well. From this activity, players will complete an achievement named “I Might Need This Later.”
Source: https://smnorton.com/how-to-remove-jills-parasites-in-resident-evil-3-remake/

HOW TO DEFEAT CRAB WARDEN IN FINAL FANTASY 7 REMAKE
A true fan of Final Fantasy knows how addictive this series of games is. In the category of best RPG games, Final Fantasy 7 Remake is trending on top. Square Enix did a great work of launching the remake of the game with various new characters and monsters. In the game, the main villain is Shinra, who is willing to taking over the planet through sucking the blood of life forms. Cloud and his teammate were walking over to stop every villain from their areas from the help of team strength. Avalanche, the teammate of Cloud stuck on the path because Shinra’s officers, Machines, and Turks are blocking the way to move further.

The second strongest villain of Final Fantasy 7 Remake is Crab Warden, who can take down Cloud and Avalanche on the same from its weapons and firepower. After clearing enemies in the railway station and spending some time there, the mascot “Stamp” was left behind from scout. Then Cloud and his teammates come across Crab Warden in their path to force them to engage in the battle of deathmatch. To win that match, here are the guides to follow.
Defeat Crab Warden in Final Fantasy 7 Remake
Crab Warden is packed with weapons that can clear anyone who comes in its path and also way more challenging than any other villain in the game. While battling with Crab Warden, there are a total of three phases of the battle. In the second and third, the rise of damage and mobility increases. To defeat Crab, electricity is much effective, but it has an item that can immune it from all types of attacks, even if it is slow, poison, silence, or anything else. In the first phase of the battle, try to attack the legs of Crab to keep it unsteady in the battle so it will take time to attack the player. The crab will attack through fire cannon and machine-gun attacks, and the main aim will be on Cloud. The enemy will ignore other team members on the field. To defend yourself from Missiles Barrage, it is better to avoid, but players can block them too. While doing it, keep other character attacks on the legs of Crab and keep weakening its legs as fast as possible.
In the second phase of the battle, Crab will call out for its Slug-rays for stun Cloud and other members from electric beams. Defend from this attack through Lightning magic and Barret while avoiding the barrage missile of Crab. Try to destroy the legs of Crab from Flame thrower and Wildfire. These attacks will be much effective against the enemy, but in the third phase, these will not be in much help. Keep maintaining the distance while using a flamethrower on the legs and use Cloud’s triple slash to attack three targets at the same time with more serious damage. Tifa will use its Omnistrike move, which was before uppercut. It will give serious damage to Crab this phase of the battle will over too.
Stage three-phase is the final phase of the battle and the most difficult part of this battle. Crab Warden will gain Surge and will charge take Charge. In this phase, usage of Wildfire and flamethrower shouldn’t be stopped because their damage and frequency of use will increase. The Surge will take time to start the battle, which means players will have time to move to those areas where they get less damage. While this incident battle, Crab will stay immobile. The Crab Warden will use salvo launchers, and the health meter will be bigger than the legs. This time Crab will be much weaker, and after defeating Surge, Charge will take the lead. Tackle the attack of Charge at keep using the attacks to take down both of the enemies.
The Crab will be defeated, and it will reward a huge amount of EXP level to players and special Metal Knuckle for character Tifa. Defeating bosses in Final Fantasy 7 Remake is a big challenge itself. Without the help of teamwork and strategy, it is impossible for one player to defeat any villain.
Source: https://sewebroot.com/how-to-defeat-crab-warden-in-final-fantasy-7-remake/

Fallout 76: How to Get Maximum Gold Bullion and Treasury Notes
The Wastelanders update has done the things for Fall Out 76 as numerous gamers are opting to play it. The update has brought several new features and changes in the world of Fall Out 76. Thus, the game now feels entirely new. Even several gamers have also renamed it as Fall Out 76 Wastelanders. The update has brought new weapons, new monsters, and new currency known as Gold Bullion. Players across the globe have already started playing games, thus get to know about the importance of Gold Bullion.
Through the medium of subsequent blog, we are going to feed the gamers with various methods to earn Gold bullion with ease in Fall Out 76. However, there is one requirement that all players need to fulfill, and it is to accomplish the main task of Wastelanders. As the quest and Gild Bullion are interconnected, so once the gamers completed the subsequent task, soon after, the gateway of earning Gold Bullion will open for them.

How to Get Maximum Gold Bullion and Treasury Notes
There are various specific ways to earn Gold Bullion in Fall Out 76, and one of the simplest ways is to purchase it through a local vendor. Gamers need to pay 1,000 caps to them in exchange for 50 Gold Bullion. The subsequent vendor is orientated in the Wayward location of the Smiley region. Gamers can only purchase a maximum limit of 300 Gold Bullion from that vendor in one week. Thus, the players can’t convert all of their caps into new currency from that way. So, here is another method is to exchange Treasury Notes that are rewarded after completing daily quests and events.
The gamers can easily exchange their treasury Notes through machines of Gold Press orientated in the Crater and Foundation location. However, there is also a limit of exchanging only 200 Gold Bullion in one day, but still, it makes 1400 in a week. So, by going through these two possible and straightforward ways, gamers can easily accomplish 1700 Gold Bullion in a week, which seems quite fair.
Players need to only obtain 20 treasury notes through quests and events in a single day to get 200 Gold Bullion in a day. Whereas they only have to get 6,000 Caps in one week to exchange a limited amount of 300 Gold Bullion. Once the gamers continue the subsequent process for a couple of weeks, then soon, they have a lot of Gold Bullion in their sacks. There are more than seven Treasury Notes quests in a day, and it is suggested to complete all of them to get more Gold Bullion in a day.
Conclusion
Wastelanders had become a successful deal for Bethesda Game Studios. The game is attaining an international acclamation worldwide. There are also several rumors spread about the coming of new updates in Fall Out 76. Thus, it seems that it is just a start, and there will be more surprises kept for the gamers by Fall Out 76 team. However, it is just a rumor now, and maybe it all hoax. By far, it is clear that Wastelanders makes Fall Out 76 amazing, and it is advisable for the gamers who have stopped playing it for any reason should come back at least for once to witness its new gaming experience.
The gamers who are unaware of Fall Out 76 Wastelanders should start playing it now on Xbox One, PC, and PS4.
Chloe Decker is a self-professed security expert; she has been making the people aware of the security threats. Her passion is to write about Cyber security, cryptography, malware, social engineering, internet and new media. She writes for Microsoft products at office.com/setup.
Source: https://office-uk.com/blog/fallout-76-how-to-get-maximum-gold-bullion-and-treasury-notes/

How to Fixed Invalid Value JPG, PNG Registry Error on Windows 10
after updating Windows OS to the latest Windows 10, some devices flash the error message “Invalid Value for Registry.” This error occurs when we try to view or launch any image file on our device, especially related to the format JPG or PNG. It’s the error of corrupted registry entry in the device as registry entries are responsible for storing the accurate information about the particular content of the file, application or programs. It helps the system files to communicate with the file that you wish to launch on your device.

In case, you are one of them facing registry invalidation error on Windows 10; then this blog is for you. You have to make sure and detect all the corrupted files on your device. Pursue these guidelines to know how to remove these potential threats and error messages from arising on our PC:
Reasons for Arising the Invalid Value Error
If you are facing the issue just after updating to the latest edition of Windows 10, then it might be the issue related to the clash between the file of previous and current Windows installation. Other possible issues related to this error are the invalid file or corrupted files due to the existence of malicious programs and viruses.
Before applying any workarounds, it is requested to use the Photo Viewer application or any of the third-party programs for launching the particular image. Once you have installed the program successfully, and then try to launch the image file with multiple attempts.
If the issue still arises on the device, then it is recommended to follow these procedures:
Resetting Photos Application
Resetting the image app might fix the issue as the registry fails to correlates the same.
- First and foremost, hit the Window logo and then tap on the “I” key to expand the Settings application.
- After that, Hit the Apps section and then choose the option “Features and Apps” by navigating the left-hand side section.
- Locate the listing and once found, hit the Microsoft photos panel. You can hit the Photos app there.
- Hit the Advanced related tab that is found in the lowermost section of the app’s name.
- Now, scroll the page downward and then hit the Reset tab. This option will reset the application completely.
- Once your process finishes, ensure that the issue is fixed. If not, then it is recommended to pursue another method that is mentioned below.
Removing the Registry Entries of Older Photos Application
This solution will also help you to remove the Invalid Value error on your device. You have to remove all the older editions of registry entries of your Photos Application.
- First of all, tap the Window logo and R key at one go.
- A run dialog box will launch on the screen, and then you have to enter the keywords: Regedit into the provided section followed by the Enter key.
- Now, go to the under mentioned registry keywords:
“HKEY//CURRENT-USER//Software/Classes/Local Settings_Software_Microsoft_Windows_Current_Version_AppModel_Repository_Families_Microsoft_Windows//Photos_8wekyb3d8bbwe”
- Navigate to the left-hand side section and launch the keyword mentioned below:
“Microsoft_Windows//Photos-8wekyb3d_8bbwe.”
- You will find eight entries under this key and then check all the entries carefully. If you find the four entries having the earlier edition than four, then apply the right mouse tab on each of them.
- Then, hit the Delete option there. This option will be available inside the menu Context. Sometimes, you may find only two outdated entries among the six entries. In this case, you have to remove both of them.
Note: For removing the corrupted or outdated registry entry, you have to take ownership of these available entries.
Chloe Decker is a self-professed security expert; she has been making the people aware of the security threats. Her passion is to write about Cybersecurity, cryptography, malware, social engineering, internet, and new media. She writes for Microsoft products at office.com/setup.
Source: https://haroffice.com/how-to-fixed-invalid-value-jpg-png-registry-error-on-windows-10/

HOW TO USE ITUNES SHARING?
iTunes is one of the best media players on the iOS platform and has the best tools to manage our music library. You can easily share the iTunes library with someone on the local network and see any applicable shared libraries. So, if you would like to know how it works, then follow these instructions given below carefully.
Enable iTun es Sharing
- You should launch the iTunes on your device.
- After that, click on the Preferences option from the menu bar.
- Then go to the Sharing section on the screen of Preferences.
- You have to mark the box beside the ‘Share my library on my local network.’
- Thereafter, click on the ‘Share entire library’ or choose ‘Share selected playlists’ option.
- In case you would like to share only part of the library, mark the boxes in front of every type of content you would like to share.
- You should click on the OK button once you have done it.
- Now, you should share the iTunes library.
Modify Mac Firewall Settings to Permit iTunes Sharing
- Navigate to the Apple menu at the upper left-hand side of the screen.
- After that, click on System Preferences.
- You should choose the System and Privacy option.
- Go to the Firewall section and select it.
- In case the Firewall is disabled, then you do not require to do anything.
- In the case of Firewall, us enable then choose the lock in the lower side of the screen.
- Then input the admin password.
- You should click on the Firewall Options.
- Navigate to the iTunes and list switch the toggle of ‘Allow incoming connections’ via the sight of the arrow on the right-hand side.
- Later, pick the OK button to apply the changes.
- Now, iTunes sharing is permitted.
Modify Windows Firewall Settings to Permit iTunes Sharing
- Navigate to the Windows search on your system.
- After that, input ‘firewall’ into it and select the OK button.
- Then you should click on the ‘Windows Defender Firewall.’
- Go to the ‘Allow an app or feature through Windows Defender Firewall’ at the left-hand side menu.
- You should click on the Change settings option.
- Then move down to the apps list and mark the box beside the iTunes.
- Later, mark both boxes of public and Private to the right-hand side.
- Then click on the OK to apply the changes.
- Now, iTunes sharing is permitted.
Conclusion
The article will tell the users about specific ways to solve the subsequent issue. The prior thing is to be aware while reading the provided workaround alongside implement the steps in the same order as we did it. We are extremely apologetic if you find any mistake or wrong information in the article. We hope you will find a cure to your problem through this article.

How to setup the Google Stadia Controller?
Stadia is one of the best services for game streaming given by Google. It offers you the newest games on your preferred gaming device like Phone, PC, or Chromecast Ultra. For Stadia, you don’t require high-level PC or any special hardware because of its compatibility with any third-party controllers. It gives you the best gaming experience with a lot of methods to play. So, if you would like to configure the Google Stadia Controller, then here are the instructions given below.

Link Stadia Controller to Wi-Fi
- First of all, you have to open the Stadia application on the matchable tablet or phone.
- After that, press the button of Stadia on the controller till the controller vibrates.
- You should select the controller button on the top right-hand side of the application of Stadia.
- In the case of the pop-up, turn on the location access, Bluetooth, and Wi-Fi.
- You have to wait for the application to locate the controller then choose it over the list.
- Then wait for the controller to vibrate then select the Yes option in the application of Stadia.
- You should select the Continue button to specify you should read the statement of microphone privacy.
- Select if or not to usage data and share diagnostic.
- Go to the ‘Connect to (your Wi-Fi network name).
- Input the network password and select the Connect.
- You have to wait for the controller to link.
- Navigate to the Next once pop-up, select the Done.
- Now the controller is linked to Wi-Fi. You should begin to configure the Stadia with the Chromecast quickly, whether you have the Chromecast linked and should view the pop-up or proceed reading for additional specific steps.
Link Stadia Controller to Chromecast Ultra
- You should connect the Chromecast Ultra and move to the TV to the suitable HDMI input.
- Don’t forget to Chromecast Ultra to linked to the similar Wi-Fi connection as the Stadia controller.
- You should press down the button of Stadia on the controller once you feel the controller vibrates, showing that it has a switch on.
- Then check the TV for a Stadia linking code.
- Now, input the code via the controller of Stadia.
- Get back to the application of Stadia on the table or mobile and select the ‘avatar’ in the top right-hand side of the screen.
- You should choose the Chromecast you have linked the controller also.
- If pop-up, choose the account of Google that you use with Stadia then select the Connect button.
- Now, you have to wait to complete the process then select the Done button.
Configure and Use Stadia Controller with Phone or PC
- Firstly, connect the USB A to C, or USB C to C cord into the PC then link the other side to the Stadia controller.
- Go to the ‘Stadia.com’ using Chrome and log in to the account of Stadia.
- You should begin playing the game of choice with your Stadia controller.
Connect Stadia Controller to Pixel Mobile via Stadia application
- Firstly, link the Stadia controller to the Pixel 2 to 3 or 4 mobiles via a USB-C cord.
- After that, open the application of Stadia on the phone.
- Now, begin playing your desired game using the controller of Stadia.
Chloe Decker is a self-professed security expert; she has been making the people aware of the security threats. Her passion is to write about Cyber security, cryptography, malware, social engineering, internet and new media. She writes for Norton products at norton.com/setup.
Source: https://justnorton.com/how-to-setup-the-google-stadia-controller/

HOW TO USE APPLE FAMILY SHARING ON MAC & iPhone?
Family Sharing is one of the best features given by Apple, it allows to share the App Store, Apple Books, and iTunes Store all for free. If one of your family members purchased one of these subscriptions, then you can simply use it without any restriction by using the Family Sharing feature. If you would like to know how it works and set it up, then here are the instructions to do so.

Configure Family Sharing on iOS Device
If the users are attempting to configure Family Sharing on iOS devices, then they should correctly employ the given instructions.
- You should select the Settings application to launch it on your device.
- After that, select the name in the upper side of the display.
- Go to the ‘Set Up Family Sharing’ and select it.
- You have to choose the Get Started option.
- Select the top feature you would like to share with your members of Family.
- Other functions should be included once Family Sharing is configured.
- You should verify the account of Apple ID, whose purchase you would like to share. It will possibly be the Apple ID you are logged in with.
- It is shown on the upper side of the display. Move to another Apply ID by selecting the ‘Use a Different Account’ or use the recent one by choosing Continue.
- Using Family Sharing, verify the payment process. Every bought process made by each family member is billed to its card.
- If you would like to use ‘the default payment method on file’ option, then select the Continue button.
- If not, select the ‘Use Different Payment’ to choose the different options.
- You should begin inviting people to the group of Family Sharing by selecting ‘Invite Family Members.’
- It may be asked you to confirm the card of payment from instruction 7. In case so, input the detail requested and selected the Next button.
- You have to select how many you would like to invite you to someone. You should share them an invitation through Messages texting application of Apple or do it in someone by having them sign-in their Apple ID on the device.
- Once you have done, select the Done button.
- As people admit invitations to join the group, they will show into the screen of Family Sharing of the application of Settings.
Using Family Sharing on iOS Devices
If you would like to use Family Sharing on iOS device, then you can determine to pursue the directions given below.
- Navigate to the Settings on your system.
- After that, select your name.
- Then Family Sharing to select what function to tur on.
- Later, options contain store buying, subscription of Apple Music, iCloud space, your location, then the data of Screen Time.
- Select the ‘your choice’ option.
- In case select to share buying, you should download another media of family member by going to the application of the iTunes Store, Apple Books, or App Store.
- Go to the Family Purchases field and select the person’s name whose buy you would like to download.
- Now, go to the applicable items list and choose the download button.
Using Family Sharing on Mac
If the users are attempting to use Family Sharing on Mac, then they should correctly employ the given instructions.
- You should launch the Apple Books, Mac App Store, or iTunes program on the MacBook.
- Then reach the menu of Purchased in the upper left-hand side of the screen, select the name to view each user whose purchases you should download.
- After that, choose the user whose buy you would like to download.
- You should search for the purchase categories that apply to you.
- Now, once you locate what you would like to download, select the download button.
Disable Family Sharing
If you would like to disable Family Sharing, then you can determine to pursue the directions given below.
- First of all, you have to delete each member of the group of Family Sharing by navigating to the Settings and then reach ‘your name.’
- After that, select the Family Sharing then choose the person you would like to delete and select Remove.
- Redo this method for each member of the Family Sharing group.
- Once each member has been deleted, select the name on the screen of Family Sharing.
- You should select the ‘Stop Family Sharing’ option.
- Now, reach the screen, which prompts at the lower side of the display.
- Finally, select the Stop Sharing option.
Source: https://smnorton.com/how-to-use-apple-family-sharing-on-mac-iphone/

Zoom Meetings: How to Host & Join on iPhone
Zoom has gained much popularity among the users working from for the last couple of months due to the current health emergency. The video conferencing app allows the users to set up, host, and join video calls and chats for remote work, social events, and meetings. Now, Zoom has made its video conferences much easy for the countless people who are working from working amid the ongoing health emergency. Multiple people across the globe are relying on this particular video conferencing app for arranging the remote meetings as the app is mainly focused on serving the needs of the business enterprises and institutions. The video conferencing app is capable of adding at least 100 participants at the time for 40 minutes and even on the free subscription plan. Many colleges, universities, research institutions, and schools have been shut down all across the world due to health emergencies, which has forced them all to begin online classes through the Zoom video conferencing app.

So, if you are also depended on Zoom video conferencing app for your work relate meetings and don’t know the procedure to host or join a meeting through Zoom video conferencing app from your iPad or iPhone devices, then you can follow the below-given instructions:-
The steps are, however, straightforward, but before that, you should install the zoom video conferencing app available on the store of Apple application. Now, you can follow the below-given instructions:-
- The users need to go to the Zoom video conferencing app then open it.
- After then, you will need to select “Sign up” if you don’t have an account on Zoom. However, being the user, you don’t need to have the account while joining the meeting through the Zoom video conferencing app.
- Further, the users will need to fill their user id and then click on Sign up appearing on the right corner of the screen.
- After receiving an email verification message for processing the activation of your account on the Zoom app, you need to tap on Activate Account and then create your account by entering your password.
- Once you activate your account, then you will get several options for hosting, joining, and scheduling meetings through Zoom on your iPad or iPhone devices.
- Also, the users will be able to see the option of screen share with other participants, and by selecting and clicking on New Meeting, you can host a remote meeting.
- The users will need to make sure to enable the option “Use Personal Meeting ID” and then click on Start a Meeting.
- Now, the users can launch the camera of their iPad or iPhone and start the meeting on the Zoom app. Also, they will get several other options, such as sharing the content or seeing the participants.
- You can exit the video conference Zoom meeting by tapping on the End button.
- Again, you can tap on the option of “Join” by going to the main menu if you wish to attend a remote through the Zoom app.
- The users who wanted to join the meeting will be provided a Meeting ID by the host of the meeting. By tapping on Join and entering the Meeting ID, you can join the meeting.
Zoom is gaining popularity everywhere in schools, colleges, universities, companies, institutions, medical offices, etc. as all are resorting to online classrooms, teachings, meetings and presentations due to the current health emergency. Zoom offers several plans to make the video conferencing more smooth and useful, which includes free and paid subscription plans. You can avail linger durations for your meetings by paying for the programs.
Chloe Decker is a self-professed security expert; she has been making the people aware of the security threats. Her passion is to write about Cyber security, cryptography, malware, social engineering, internet and new media. She writes for Microsoft products at office.com/setup.
Source:https://haroffice.com/zoom-meetings-how-to-host-join-on-iphone/

House party: Playing Games with Friends While Video Chatting
House party app is gaining popularity among people all across the world amidst the ongoing health outbreak issue. The app has gained so much popularity when the other apps are appeared facing a lot of problems. This all has become possible due to the availability of the option to play multiple video games on the app. With the outbreak of the ongoing health outbreak issue when the whole population across the globe was forced to stay at home and work from home, the demand for communications apps and other app witnessed a considerable rise. Amidst such a situation, when it becomes difficult for the school going kids and college-going youth to spend their time, the gaming ability of the House party app came to their great rescue.
![]()
There are still some users who are not aware of the app then they should understand that the House party is just like some other video chat app that allows users to start a chat with the group of at least eight people at the time. Moreover, the app also allows anyone who wanted to join the video chat just by sending the link, which is much similar to the feature introduced in Zoom. The emphasis put on games in the apps like Skype, Hangouts, or House party is making much more popular as most of the games could be accessed freely. The process to access to such games are also very easy once you know how to launch it.
Ways to Find Games in House party and start to Play
If you are new to the House party app, then you might not be known where you can find the games. The users, when signed up to the app after login into their mobile devices they will be directed to the primary section where they can add the participants by clicking on the icon of + available at the top. You can find four significant games on offer including Trivia, Heads Up, Quick Draw and Chips and Guac. You will need to search the more plays when it comes to adding them as the games will not be available in the main menu. The users will need to close the main menu and then click anywhere on the screen. The users will need to click on the icon of dice, which will appear below the symbol of +. When the users click on the dice icon, they will get the complete list of the game. Now, if you want to open the game, then you will be given two options. As the first option, you will need to hit on the dice and then call the participants to play the game while picking a particular game. In the second option, you need to click on the icon of dice, and then after selecting the game, you will need to invite friends. Most of the users may find the four games not enough, but there is nothing to get worried as there are several subcategories also to make the games more entertaining.
Chloe Decker is a self-professed security expert; she has been making the people aware of the security threats. Her passion is to write about Cyber security, cryptography, malware, social engineering, internet and new media. She writes for Microsoft products at office.com/setup.
Source: https://office-uk.com/blog/houseparty-playing-games-with-friends-while-video-chatting/

OnePlus Announces Crackables 2.0 with $10,000 Grand Prize
OnePlus has announced the latest version of its mobile puzzle game called Crackables 2.0. Here is how you can participate in it.
OnePlus has recently launched the latest version of the mobile game based on puzzles called Crackables 2.0. the newly launched game has multiple digital puzzles supported by the technology of Google . The newly launched mobile puzzle game has a vast range of puzzles having different difficulty levels from beginners to the experts of the game. The more exciting thing about the recently launched puzzle game is that it has a whopping cash prize too. Moreover, users can help the governments and countries in their fight against the ongoing health emergency all across the globe. OnePlus has resumed its partnership with UNIT9, who also worked for developing the first part of Crackables puzzle game. The game director of the production studio, Jakub Jakubowski, while describing the original version of the Crackables said that it was an exceptional combination of story-driven and compelling puzzle developed with the innovative use of modern technology and design.

OnePlus has also enlisted the Sleep Deprivation Lab along with UNIT9 to work on the development of the newly announced puzzle game. It is worthwhile to know that the original version of Crackables was a hugely popular game as the number of the community members taken part in the game exceeded more than half-million when it was released. However, the first Crackables did not get any release despite its popularity, but the latest version is all set to get it. Also, the challenge in the new game is very high, but it is rewarding too. The release date of the latest game is April 14, and registration to participate in the puzzle game has already began.
The players can Win a Whipping Cash as a Reward For Resolving Puzzles
The players can win a huge prize when they compete in the puzzle game after its official release. The players will have to join the competitor’s community of the game spread all across the globe. According to a statement by OnePlus, it has been told that the puzzle will remain comfortable at the beginning of the game, but as on the game, start progressing it will go on harder. The players will be allowed to advance through the next puzzle “gate” with each completed puzzle, and some players will need to form a group with other participating players. The ten winning players who will solve the last problem successfully at first will get the cash prizes.
The newly announced game is time-restricted, as was the same case in the previously launched game as the game will close on April 30 officially. Also, the puzzle game is fascinating and interesting for both casual and serious players as the casuals can play it for entertainment, and the serious can concentrate on solving the puzzles which could get them the cash prize. The announcement of the new puzzle game could be seen as the best entertainment while sitting at home as most of the people are confined to their homes due to ongoing health emergency outbreaks. The game will not only entertain them but also help them to fight with the current situation patiently.
Chloe Decker is a self-professed security expert; she has been making the people aware of the security threats. Her passion is to write about Cyber security, cryptography, malware, social engineering, internet and new media. She writes for Microsoft products at office.com/setup.
Source: https://haroffice.com/oneplus-announces-crackables-2-0-with-10000-grand-prize/

How to Fix Skype Error Code 0x80070497 in Windows 10
Windows 10 is a reliable operating system and regular free updates are one major reason behind it. Although Windows 10 is the most popular operating system there are some errors that can hinder the user experience on the otherwise secure OS. Several users complain facing Skype error code 0x80070497 on Windows 10, so in this article, we will teach you how you can fix Skype error code 0x80070497 in Windows 10.
 Windows 10
How to Fix Skype Error Code 0x80070497 in Windows
Using Command Prompt
Here are the steps on how to fix Skype error code 0x80070497 in Windows 10 through command prompt:
- Launch the Command Prompt.
- You can also tap Windows + X key on your keyboard and select Command Prompt “Admin.”
- Here you have to stop Windows updates service and BITS service in the command prompt.
- To start the command, you need to enter the following command:
- net stop bits
- net stop wuauserv
- Now deletes qmgr*.dat files, to remove this enter the following command prompt and tap Enter:
- Del “%ALLUSERSPROFILE%Application DataMicrosoftNetworkDownloaderqmgr*.dat”
- If you are doing this step first time, then you need to skip the above steps and go through the next steps given below. If you are done all the steps and not get success, then repeat the steps and remember to follow all the steps without skipping ant steps.
- It is one of the useful messages that you need to use carefully, here are other methods that can help you to fix this error:
- Here you need to run three commands in the command prompt to change the name of the folder, and every time you need to enter with the command:
- Ren %systemroot%SoftwareDistributionDataStore *.bak
- Ren %systemroot%SoftwareDistributionDownload *.bak
- Ren %systemroot%system32catroot2 *.bak
- Here you need to reset Windows updates service and BITS service as default security description. To process these steps, you need to enter the command in the command prompt:
- sc.exe sdset bits D:(A;;CCLCSWRPWPDTLOCRRC;;;SY)(A;;CCDCLCSWRPWPDTLOCRSDRCWDWO;;;BA)
- (A;;CCLCSWLOCRRC;;;AU)(A;;CCLCSWRPWPDTLOCRRC;;;PU)
- sc.exe sdset wuauserv D:(A;;CCLCSWRPWPDTLOCRRC;;;SY)(A;;CCDCLCSWRPWPDTLOCRSDRCWDWO;;;BA)
- (A;;CCLCSWLOCRRC;;;AU)(A;;CCLCSWRPWPDTLOCRRC;;;PU)
- After this above command you need to enter the given command in the command prompt and then tap the Enter button on your keyboard:
- cd /d %windir%system32
- Next enter the following in the command prompt and then tap the Enter key on your keyboard:
- cd /d %windir%system32
- Now In the windows updates service and BITS service these steps maybe get several commands that user need to enter in the command prompt to fix this issue here are the following command you need to enter the command and Tap Enter button with each command:
- regsvr32.exe atl.dll
- regsvr32.exe urlmon.dll
- regsvr32.exe mshtml.dll
- regsvr32.exe shdocvw.dll
- regsvr32.exe browseui.dll
- regsvr32.exe jscript.dll
- regsvr32.exe vbscript.dll
- regsvr32.exe scrrun.dll
- regsvr32.exe msxml.dll
- regsvr32.exe msxml3.dll
- regsvr32.exe msxml6.dll
- regsvr32.exe actxprxy.dll
- regsvr32.exe softpub.dll
- regsvr32.exe wintrust.dll
- regsvr32.exe dssenh.dll
- regsvr32.exe rsaenh.dll
- regsvr32.exe gpkcsp.dll
- regsvr32.exe sccbase.dll
- regsvr32.exe slbcsp.dll
- regsvr32.exe cryptdlg.dll
- regsvr32.exe oleaut32.dll
- regsvr32.exe ole32.dll
- regsvr32.exe shell32.dll
- regsvr32.exe initpki.dll
- regsvr32.exe wuapi.dll
- regsvr32.exe wuaueng.dll
- regsvr32.exe wuaueng1.dll
- regsvr32.exe wucltui.dll
- regsvr32.exe wups.dll
- regsvr32.exe wups2.dll
- regsvr32.exe wuweb.dll
- regsvr32.exe qmgr.dll
- regsvr32.exe qmgrprxy.dll
- regsvr32.exe wucltux.dll
- regsvr32.exe muweb.dll
- regsvr32.exe wuwebv.dll
- Next, reset Winsock and enter the following command:
- netsh reset Winsock
- Then tap Enter key on your keyboard.
- Now reset your Windows updates service and BITS service and enter the given command:
- net start bits
- net start wuauserv
Chloe Decker is a self-professed security expert; she has been making the people aware of the security threats. Her passion is to write about Cyber security, cryptography, malware, social engineering, internet and new media. She writes for Microsoft products at office.com/setup.
Source: https://haroffice.com/how-to-fix-skype-error-code-0x80070497-in-windows-10/

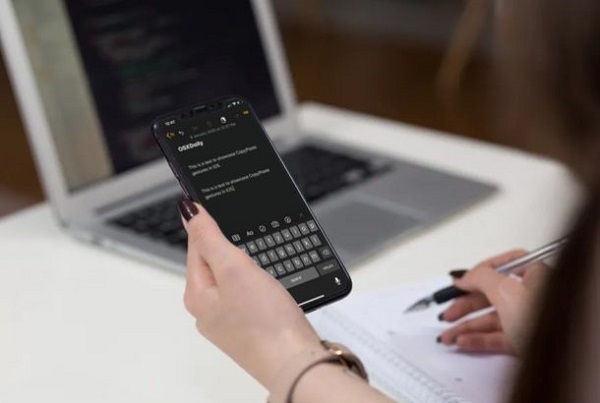
How to Copy Paste iPad & iPhone Gestures
The gestures introduced in iPhones have always been a point of contention for the users of Apple mobiles. For instance, it was so frustrating that some of the users often tend to shake their iPhones violently as the most comfortable resort to undo their text when caught in the middle while crafting any sentence. But, Apple has provided an excellent solution to such problems by introducing the latest updates of iPadOS and iOS. The recently launched updates are offering newer gestures and are easy to use for the users who are willing to use gestures for copying and pasting on iPad or iPhone. The new gestures could be used to manipulate data by taking new and the latest approaches. So, if you are interested in giving a quick try to the new gestures for copy and paste then the users can follow the below-given steps for doing it:-
 Copy Paste iPad & iPhone Gestures
The new gestures are available to iPads and iPhones running exclusively iPadOS 13 and iOS and later. The gestures will work everywhere on such devices while typing or entering the data, whether it’s the image, video-related information, or text. Before completing the procedure, you need to make sure that all your devices are updated. Here are the steps to go:-
- The users can open any app where they want to select the required data such as Notes app on iPad or iPhone.
- Now, the users will need to type any text in the Notes app, which is blank.
- Further, you have to select the previously typed task. And for that, the users have to click double in case of a single word on the displayed screen.
- If you want to select a whole sentence, then click triple and click quadruple if it is a paragraph.
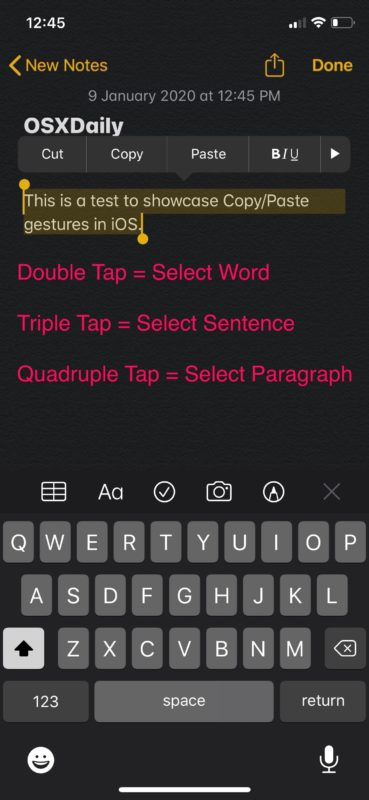
Now, the users will need to compress the screen at the same time with three fingers for copying the text. The users can view the badge of copy appearing at the top of their screen if copying the typed text will be done successfully.
In the next step, you will need to paste the content copied previously and stored on the Clipboard of your device. For pasting the content, place your 3 three fingers on the content and pinch out. Wait for the confirmation regarding the Paste.
Now, the users can quickly and freely copy and paste the required texts on their iPad and iPhone devices. It will take only a few seconds to copy the required information from one app and then paste it to some other application. It becomes more convenient for you when you are trying to share the links with your friends and relatives on several web pages of social media. The users may need some time to get used to the gesture, as some users may find it convenient to use two of their fingers and the thumb. However, it is very much similar to the Pinching and zooming feature used by the people when they browse through maps; however, the exception is only the use of three fingers here. It may come to the minds of people that Apple may have designed this feature for the larger screens of the iPads.
Apart from providing gestures form making copying and pasting quick, iOS also offers several gestures for improving and enhancing the usability of your iPad and iPhones. For instance, the users can choose several photos in the application of Stock Photos quickly by using the gesture of drag and slide. Also, you can Zoom in and Zoom out a video by using the action of pinch to zoom. Moreover, new redo and undo gestures are also available in the iPadOS and iOS. It is not a secret right now that most of the users use their iPad and iPhone devices for texting, typing, posting content to social media sites, and writing emails. So, the use of new gestures will help the users immensely and enhance their experience of typing.
Chloe Decker is a self-professed security expert; she has been making the people aware of the security threats. Her passion is to write about Cyber security, cryptography, malware, social engineering, internet and new media. She writes for Microsoft products at office.com/setup.
Source: https://office-uk.com/blog/how-to-copy-paste-ipad-iphone-gestures/

Fixed: Screen Time Limits Not Working on Xbox & Windows 10 PC
The screen Time limit often helps the parent in exercising parental control over their children if they are spending more time than usual time on several devices. Screen Time indicates the time spent by your children on different devices, whether watching movies on television, playing video games, or uploading videos and photos on social media sites. According to research, it has been proved that children are spending more time on electronic media than spending time on any other activities, which is 7 hours a day as an average. Spending too much time on electronic media has adversely affected the children as they are doing such things on the cost of their sleep. This has resulted in poor grades and increasing cases of obesity among the kids. Another significant adverse effect related to spending more time on electronic media is reducing the engagement of children in educational activities. Screen time limit helps you to protect your children from becoming the slave of their habits. You can see the list of time spent by your children on several devices during the week or month. You can tap on Settings and adjust the screen time limits of your children.
 Xbox & Windows 10 PC
If you are struggling with Screen Time limits and it is not working correctly on Xbox and Windows 10 PC, then you can take the following steps:-
1. Setting up one schedule
The users can set up one schedule which applies to all devices of their children. The feature is available with the latest version of Windows 10. In simple terms, if you have set a screen time limit of 5 hours, then your kids will spend only that much time on every device, including Windows 10 and Xbox One. If your kids have crossed that time limit, then the settings made by you will track it separately.
2. Updating Windows
It is straightforward to update the windows by following straightforward steps which are the following:-
- Go to the start button and then choose Settings by clicking on it.
- Now, the users will need to go to the Update and Security tab under Settings.
- After clicking on Update & Security, click on Windows update.
- At last, the users can check the available updates and then proceed to install the required one.
If you are searching the details of the updates, then clicking on the Details option would be of much use. But, if you are still looking for more information, then clicking on Learn, more options will be more beneficial for you.
3. Restarting the Device
Users can reset their devices if they are not getting any solution still. They need to tap on the Start menu while selecting it. Then, click on the option of Power and then click on Restart appeared under the Power tab.
4. Sign in
You have to make sure that the child is signed in with his registered Microsoft account on his device. The parents can check it with some easy steps that account for their children is synced correctly. First of all, go to the Start button and select it. After that, tap on Settings and then click on Accounts. The parents will need to follow the prompts appearing to them to complete the whole process.
5. Keeping it in the Family Group
You can prevent your kids from adding new accounts on their Xbox by following the below-given steps:-
- First of all, press down the button of Xbox.
- Then, choose the option System and click on it.
- After that, click on Settings and then click on System.
- Now, log out content restrictions.
You are advised to create a guest key and then turn off the option. Let people download and then turn off the choice of Make new accounts.
Chloe Decker is a self-professed security expert; she has been making the people aware of the security threats. Her passion is to write about Cyber security, cryptography, malware, social engineering, internet and new media. She writes for Norton products at norton.com/setup.
Source: https://justnorton.com/fixed-screen-time-limits-not-working-on-xbox-windows-10-pc/
